Last Updated on January 14, 2024 by Tayyab Sarim
Are you tired of struggling with recoil in Apex Legends? Do you want to take your gameplay to the next level? Look no further. In this guide, we’ll provide you with the best Apex controller settings for no recoil, allowing you to elevate your gameplay and secure those wins.

With the right controller configuration, you can minimize recoil, improve your aim, and gain a competitive edge. We’ll explore the various controller settings and provide tips and recommendations to help you find the optimal configuration for your playstyle.
So buckle up, grab your controller, and let’s dive into the world of apex controller settings.
Understanding Recoil in Apex Legends
If you’re an Apex Legends player, you’re likely familiar with the concept of recoil. Recoil refers to the vertical and horizontal movement of your weapon when firing that can impact your aim and accuracy. Recoil patterns can vary between weapons, making it crucial to understand how to control recoil in Apex Legends.
Recoil can be mitigated by adjusting your controller settings to find the perfect balance between precision and speed. With the right settings, you can minimize recoil and gain a competitive edge in Apex Legends.
Fun Fact: Certain weapons in Apex Legends, such as the R-99 submachine gun and the Hemlok burst assault rifle, have more significant recoil patterns than others.
Finding the Right Sensitivity Settings
When it comes to minimizing recoil and improving your accuracy, finding the right sensitivity settings is crucial. Sensitivity refers to the amount of movement required on the controller to move the crosshair on your screen. Too high sensitivity can make it difficult to control the recoil, while too low sensitivity might make it hard to track moving targets.
The optimal sensitivity settings depend on your individual playstyle. However, there are a few general guidelines you can follow to find the right configuration for you:
- Start with a low sensitivity setting and gradually increase it until you find the right balance between speed and precision.
- Experiment with different sensitivity settings for different weapons as recoil patterns vary between them.
- Take breaks and evaluate your progress. It’s important to give your brain and muscle memory time to adapt to the changes.
Once you have found the optimal sensitivity settings, it’s crucial to configure your controller accordingly.
Here are some additional tips:
- Disable any unnecessary controller vibration as it can interfere with your aim and precision.
- Adjust your trigger sensitivity to make it easier to control the recoil, especially when firing full auto.
- Consider using a controller with paddles on the back to allow more control and reduce the need to move your thumbs as much.
Keep in mind that finding the perfect sensitivity settings might take some time and practice, but the benefits are definitely worth it. With the right configuration, you’ll be able to minimize recoil and elevate your gameplay in Apex Legends.
Adjusting Aim Assist for Better No Recoil Control
If you find yourself struggling with recoil control, the aim assist feature on your controller can be a game-changer. Aim assist helps you stay on target by slightly adjusting your aim as you near an enemy.
However, not all aim assists are created equal, and finding the right balance is key to reducing recoil. Here are some tips for adjusting aim assist to optimize your recoil control:
- Lower the aim assist strength: While aim assist can help with keeping your aim on target, it can also interfere with your ability to make precise adjustments to your aim. Lowering the aim assist strength can help you maintain control over your shots while still benefiting from the feature.
- Adjust the aim assist window size: The aim assist window size is the area around an enemy where aim assist engages. Reducing the window size can help you avoid having your aim pulled towards unintended targets, giving you more control over your shots.
- Try different aim assist types: Apex Legends offers different aim assist types, such as Standard and Linear. Experimenting with these options can help you find the one that works best for your playstyle and reduces recoil the most.
Remember, finding the right aim assist settings will require some experimentation and practice. But with time, you can adjust your controller settings to help you minimize recoil and take your gameplay to the next level.
Button Mapping for Quick Recoil Control
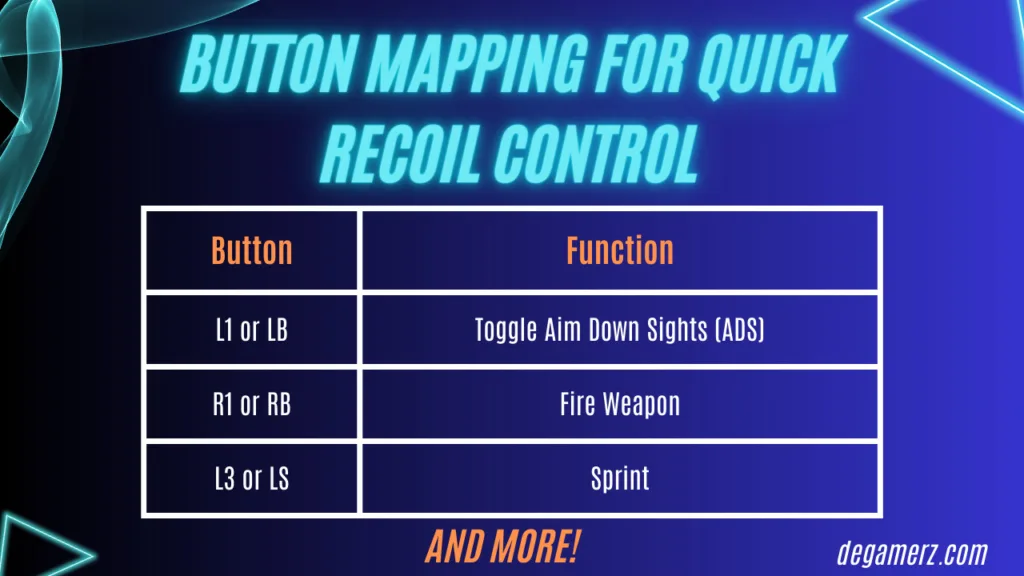
Are you tired of losing gunfights due to excessive recoil? Fortunately, adjusting your button mapping can help you quickly control recoil and gain a competitive advantage. Here are some button mapping configurations to optimize your recoil control:
| Button | Function |
|---|---|
| L1 or LB | Toggle Aim Down Sights (ADS) |
| R1 or RB | Fire Weapon |
| L3 or LS | Sprint |
| R3 or RS | Melee Attack |
| X or A | Jump |
| O or B | Crouch/Slide |
| Triangle or Y | Interact/Reload |
By mapping ADS to the left bumper (L1 or LB), you can easily aim down sights while keeping your thumbs on the sticks, allowing you to maintain control over recoil. The right bumper (R1 or RB) is ideal for firing your weapon since it requires less pressure compared to the trigger. Utilizing melee attacks on the right stick (R3 or RS) can provide quick, precise adjustments to your aim during close-range gunfights.
Remember, these mappings may not work for everyone, and experimenting with different configurations is key to finding what works best for you. With these button mapping configurations, you’ll have the tools you need to quickly control recoil and gain an edge over your opponents.
Sensitivity Transition for Recoil Compensation
When it comes to minimizing recoil in Apex Legends, understanding sensitivity transition is key. Sensitivity transition is the process of changing your controller’s sensitivity settings when aiming down sights. By doing so, you can compensate for the recoil of different weapons and improve your overall accuracy.
To set up sensitivity transition, you’ll need to adjust your controller’s sensitivity settings for both hip-fire and ADS. Start by finding a sensitivity that feels comfortable and allows you to aim quickly, yet accurately, in hip-fire mode.
Next, you’ll want to experiment with your ADS sensitivity settings until you find a transition that compensates for the recoil of your weapon. For example, if you’re using a weapon with a lot of vertical recoil, you may want to set your ADS sensitivity to be slightly lower than your hip-fire sensitivity. This will allow you to more easily compensate for the upward recoil of the weapon when you aim down sights.
Example:
For instance, let’s say you’re using the R-99, a weapon with high vertical recoil. You’ve found a hip-fire sensitivity setting that feels comfortable and allows you to aim quickly. However, when you aim down sights, the recoil makes it difficult to keep your aim on target. To compensate for this, you lower your ADS sensitivity setting by 10%. Now, when you aim down sights, your controller will automatically adjust to a lower sensitivity, making it easier to control the upward recoil of the R-99.
Remember, finding the right sensitivity transition settings will require practice and experimentation. However, with some time and effort, you’ll be able to find a configuration that works for you. By fine-tuning your sensitivity transition settings, you can improve your recoil control and gain a competitive edge in Apex Legends.
Experimenting with Deadzone Settings
Deadzone settings are an essential component of controller configuration that can impact your recoil control and aim precision. In simple terms, a deadzone refers to a range of stick input around the center point that doesn’t register any movement. Deadzone settings determine the size of this range, with a smaller deadzone resulting in more precise control.
The optimal deadzone settings can vary based on your controller and personal preferences. However, a good starting point is to experiment with a deadzone of around 5-10% for your right stick and 0% for your left stick. This should provide a nice balance between precision and ease of use.
To fine-tune your deadzone settings, follow these steps:
- Enter the settings menu for your controller on Apex Legends and locate the “Deadzone” option.
- Try adjusting the deadzone size up and down to see how it impacts your aim and recoil control.
- Practice using different deadzone sizes in the training range or in-game to see how they perform in action.
- Gradually adjust your deadzone settings until you find the ideal balance based on your gameplay style and preferences.
Benefits of Experimenting with Deadzone Settings
By experimenting with different deadzone settings, you can achieve the following benefits:
- Minimizing your recoil by achieving greater control over your aim
- Increasing your precision when aiming at enemies
- Improving your overall gameplay experience and enjoyment
Remember, finding the ideal deadzone settings will take some experimentation and practice. Try out different settings and see what works best for you. With the right configuration, you can take your gameplay to the next level and dominate in Apex Legends.
Modifying Stick Response Curves for Better Recoil Control
If you’re struggling with controlling recoil in Apex Legends, modifying your stick response curves could be the solution you’ve been searching for. Stick response curves determine how your controller translates your movements into in-game actions, including recoil control. Here is everything you need to know about stick response curves and how to use them to improve your gameplay.
What are Stick Response Curves?
Stick response curves refer to the relationship between the position of your joystick and the movement of your in-game character. By modifying the stick response curve, you can control the sensitivity of your joystick at different positions, enabling you to find the perfect balance between speed and precision.
There are three main types of stick response curves available on most modern controllers:
- Linear Response
- Exponential Response
- S-Curve Response
How to Modify Stick Response Curves for Better Recoil Control
To modify your stick response curves, follow these steps:
- Access the controller configuration settings for Apex Legends
- Select the “Stick Response Curve” option
- Choose the response curve that best suits your playstyle
- Experiment with different response curves to find the optimal one for recoil control
Recommendations for Reducing Recoil with Stick Response Curves
Here are some recommendations for reducing recoil by modifying your stick response curves:
“For players who want more precise control over recoil, we recommend using an S-Curve Response. This response curve provides the most sensitivity when your joystick is at the center position, making it easier to fine-tune your aim for long-range shots. Alternatively, if you prefer a smoother joystick motion, the Exponential Response may be more suitable. Experiment with different response curves to find the optimal one for your playstyle.”
Fine-Tuning Additional Settings
While sensitivity settings and aim assist are crucial for reducing recoil, there are several other additional settings you can fine-tune to further optimize your controller configuration. Let’s take a look at some of these settings:
Vibration Settings
Adjusting your controller’s vibration settings can have a significant impact on recoil control. Some players find that turning off vibration altogether helps them maintain better control over their aim. Experiment with different vibration settings to see what works best for you.
Trigger Sensitivity
Trigger sensitivity adjustments can provide smoother and more responsive trigger pulls, allowing for more accurate shots and better recoil control. Consider decreasing your trigger sensitivity to minimize accidental shots due to excess trigger pressure.
Button Layout
Customizing your button layout can improve your recoil control by making it easier to access the buttons you need during intense firefights. Experiment with different button configurations and find a layout that suits your playstyle.
Deadzone Settings
We mentioned deadzone settings in a previous section, but it’s worth noting that experimenting with different deadzone settings can significantly impact your aim and recoil control. Keep tweaking your deadzone settings until you find the sweet spot that minimizes recoil without sacrificing your aim precision.
By taking the time to adjust and fine-tune these additional settings, you can further optimize your controller configuration for minimal recoil and maximum gameplay performance.
Conclusion
Congratulations on making it to the end of this guide on the best Apex controller settings for no recoil! By now, you should understand how recoil affects your gameplay in Apex Legends and how to adjust your controller settings to minimize it.
Remember, finding the right configuration will require some experimentation and practice, but with the right settings, you can elevate your gameplay and gain a competitive edge.
Start by fine-tuning your sensitivity settings and aim assist feature. Experiment with button mapping and sensitivity transitions to counter recoil patterns of different weapons. Don’t forget to adjust deadzone settings, modify stick response curves, and explore additional controller settings to further enhance your recoil control.
By following the tips outlined in this guide, you’ll be well on your way to becoming a master of recoil control in Apex Legends. So, grab your controller, apply these settings, and get ready to dominate the competition!
Common Concerns And FAQ’s
Can these controller settings completely eliminate recoil in Apex Legends?
While these settings can significantly minimize recoil, it’s important to note that recoil is an inherent mechanic in the game. These settings aim to help you control recoil more effectively, but it may still be present to some degree.
Do these controller settings work for all weapons in Apex Legends?
These controller settings can be customized to suit your preferences and work well with most weapons in the game. However, some weapons may have unique recoil patterns that require further adjustments or specific techniques to control effectively.
How do I find the perfect sensitivity settings?
Finding the perfect sensitivity settings will require some experimentation. Start by adjusting your sensitivity gradually and testing it in various scenarios to find the right balance between speed and accuracy that works best for you.
Can I use these controller settings on any console?
Yes, these controller settings can be applied to various consoles, including PlayStation and Xbox. The process of adjusting the settings may differ slightly depending on your console, but the principles remain the same.
Is it necessary to change button mapping for recoil control?
While changing button mapping is not necessary, it can provide you with quicker access to certain controls, which can be beneficial for effectively controlling recoil during intense firefights. Experiment with button mapping to find a configuration that suits your play style.
Can modifying stick response curves improve other aspects of gameplay?
Yes, modifying stick response curves can not only help with recoil control but also enhance your overall aim and precision. It allows you to fine-tune the sensitivity of the sticks, making it easier to aim accurately.
Should I adjust deadzone settings for all weapons?
Deadzone settings can impact recoil control and aim precision. While it’s not necessary to adjust them for every weapon, experimenting with deadzone settings can help you find the optimal configuration that minimizes recoil and improves your aim across different weapons.
How long does it take to get used to these controller settings?
The time it takes to get used to these controller settings will vary for each individual. It may take some time to adjust and find your comfort zone. Regular practice and gameplay will help you become more familiar with the settings and improve your overall performance.
Are there any other settings that can help with recoil control?
Yes, in addition to the settings mentioned in this guide, there are other controller settings you can fine-tune to enhance your recoil control. These include vibration settings, trigger sensitivity adjustments, and other customization options available on your controller.
How often should I reassess and adjust my controller settings?
It’s always a good idea to reassess and adjust your controller settings periodically, especially if you feel like you’re encountering difficulties with recoil control or aim. As you gain more experience and master different weapons, you may find it beneficial to make slight adjustments to optimize your gameplay.